
Refedit Zombies

One of my colleagues was trying to edit an attached XREF file using the “edit in place” command button (which actually runs the command REFEDIT) and the file would appear to start to open by showing scanning drawing but then would just fail and go back to the host file with the XREF selected.

Upon review of the command line the following error appeared.

“AcDbZombieObject objects cannot be referenced.”

Nice. AutoCAD has zombies that cause issues!
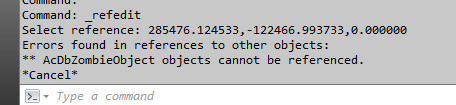
refediterror

After a bit of research, AutoCAD zombie objects are leftover database entries from other AutoCAD variants, know as vertical variants, such as AutoCAD architecture, Civil 3D, etc.

When opening files created in a vertical version of AutoCAD in “pure” AutoCAD (or LT) an object enabler is used to read the extra information created and stored in the AutoCAD file by the vertical application.

Most of the time AutoCAD will pop-up the “proxy information” box to ask you what to do about this extra information.

proxy-dialog-window2

This proxy information seems to been referred to under R13 as AcDbZombieEntity, which is another way of putting AcDbZombieObject.

——

So let’s now translate the error message.

“AcDbZombieObject objects cannot be referenced.”

AcDb – AutoCAD Database
ZombieObject – Additional proxy information

“AutoCAD database additional proxy information objects cannot be referenced.”

Now AutoDesk, wouldn’t that error be much easier to sort? Instantly the user knows that the source file has some proxy information objects that are causing issue, and either the pure AutoCAD is missing an object enabler or the information is corrupt and needs purging.

I found in this case as the reference file did not pop up a proxy box it suggested to me that the proxy information was corrupt and needed purging.

Unfortunately AutoDesk has omitted to offer a purge of these databases from the purge command, or indeed offer any other way to clean up the database. Using WBLOCK to recreate the drawing won’t work as the proxy information is tied to the objects in the drawing.

Thankfully a program addon for AutoCAD full exists under Exchange to remove these corrupt entities. It is called Zombie Killer!
Flickering LT 2014 solved

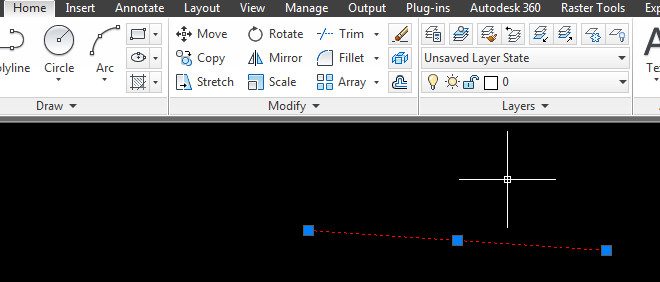
There seems to be two working solutions to AutoCAD LT 2014 flickering. One is to use a file from a previous version and the other which is far simpler to install is to use a registry patch.

Windows Registry Editor Version 5.00 [HKEY_LOCAL_MACHINE\SOFTWARE\Autodesk\AutoCAD LT\R20\ACADLT-D001\Variables\AECPSDAUTOATTACH] @=”0″ “StorageType”=dword:00000003 “SecondaryType”=dword:00000001 “LowerBound”=dword:00000000 “UpperBound”=dword:00000001 “PrimaryType”=dword:0000138b

Copy and paste the above into a text file. Rename it to autocadlt2014regpatch.reg (named only for ease of finding, the .reg is the important bit) and double click to install on affected machines. I have found that whilst this file can be stored in a server folder for ease of access, installing from the server is not possible and Windows 7 throws out an error. Just copy to desktop and install each time.


No layers information

One of my colleagues noted that they no longer could see the layers information in the Layers Drop down box when selecting objects.

autocad_pickfirstoff

The image above shows this issue, the object is on a differing layer to that shown, the Layers Drop down only shows the current layer.

In order to fix this the system variable PICKFIRST needs to be set to 1, which should be the default for this variable. Sometimes if AutoCAD crashes this seems to be reset to 0. Now when the object is selected it should display the layer information in the Layers Drop down.

autocad_pickfirston

Paperspace hidden by Modelspace Wipeout

One of my colleagues came to me today with this conundrum; the wipeout in modelspace was hiding paperspace objects. This was happening both on the screen and when plotting.

Wipeout Problem

Here you can see that the orange circle is hidden behind the blues lines. The blue lines are in model space and are the frames of the wipeout and the orange circle is in paper space.

When plotting the circle stays behind the blue lines.

The solution to plotting side of things is to ensure Paperspace is plotted last.

Wipeout Check Box

When plotting you can find this option on the right hand side. Check the plot paperspace last box.

Wipeout Solved

Now the plot will show the circle in paperspace above the wipeout in modelspace.

One one drawing I found that if you turn off wipeout frames and back on again the display is corrected, however on another this does not work. In order to turn off wipeout frames type WIPEOUT –> then F –> then OFF and then turn them back on again (WIPEOUT –> F –> ON).


Unexplodable Blocks

One of my colleagues today posed the question, why doesn’t my block explode? Firstly, I thought this was impossible, but I was wrong!

The first issue is check that it is not a group, they are very similar on the surface and can be mistaken for blocks and visa versa! X or explode cannot work on groups.

However X or explode can sometimes not work on blocks. There is a setting for blocks that I had never noticed under the block creation box, called “allow exploding”, uncheck this and your blocks cannot be exploded!

In order to get around this, bring up the block edit dialogue with nothing selected.

Then select the offending block in the list and check the “allow exploding” box. Now click OK. Yes to redefine. Note this might cause some issues with placing!

explodeblock

Now the block can be exploded!


No Thumbnails

One of my colleagues was struggling with files that did not have thumbnails. According to this (very helpful) post this is due to the THUMBSAVE setting not being set to 1.

This is a setting that is saved globally per machine but affects drawings. This can be confusing as there are global settings and drawing specific settings. Drawings saved on a machine with this off won’t create a thumbnail in the file.

Flickering update

It appears that Autodesk has not fixed the AutoCAD LT 2014 flickering issue in their recent update to service pack one. Very frustrating as it makes the software hard to use. It seems to occur less often now rather than all the time. So I will try the registry patch on this machine to see what that does.

Hatching and XREFs

It appears that there is a fundamental flaw in AutoCAD where if you clip an XREF the information AutoCAD requires in order to HATCH objects in the XREF is lost, therefore AutoCAD cannot HATCH an clipped XREF. How dumb is that.

Retaining XREF Layouts

One of my colleagues was getting very frustrated with the XREF he was using, he had set up an XREF, turn off the layers as he wanted, then saved and exited the drawing. Upon reopening the drawing he found these changes were reset to the layers on the XREF source.

AutoCAD appears to be setup strangely on my colleagues machine where it prefers to inherit layering from the source. Whilst this is a logical method it doesn’t help new users to understand how to “lock” their XREFs. By default AutoCAD should be in the “locked” mode.

Frustratingly AutoCAD also appears to have no visual way to set VISRETAIN, a toggle for XREF state in the XREF manager would be nice, perhaps a check box with a note next to it saying “Check to retain layer information in current drawing”. That way people will know what is going on!

So its back to the command line, type VISRETAIN and then set to 1 for keeping the layers in the current drawing as you want them or 0 to inherit from source.

—-

From AutoCAD help: (Copyright Autodesk).

VISRETAIN
0
The layer table, as stored in the reference drawing (xref), takes precedence. Changes made to xref-dependent layers in the current drawing are valid in the current session only and are not saved with the drawing. When the current drawing is reopened, the layer table is reloaded from the reference drawing, and the current drawing reflects all of those layer property settings.
1
Xref-dependent layer changes made in the current drawing take precedence. Layer settings are saved with the current drawing’s layer table and persist from session to session.


Inverted Arc

Ever been annoyed with AutoCAD and its silly way of drawing arcs? You always seem to managed to draw it the wrong way even though you are sure you started it in the correct place to go anti-clockwise?

No longer a problem in AutoCAD 2014! Just hold CTRL down to reverse the arc direction!