
This tutorial follows on from the text style one.
So once you have created you default text style (NOT STANDARD), click on the annotation panel again and go to the dimension style editor.
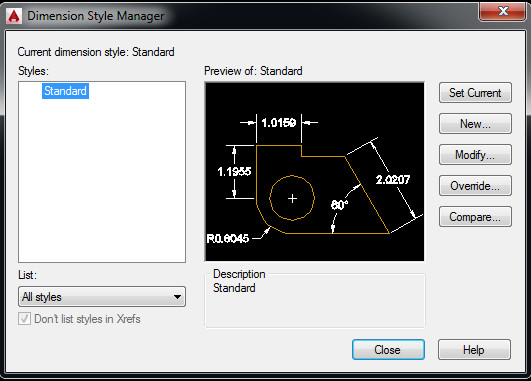
You will get a similar box to the text style dialog, albeit the preview has moved from bottom left to the centre! However the principals are the same. Again, please do not use standard.
So, click on the new and you will get a box, give the dimension a name. Again, similar to the text style, give it a name that reflects where it came from and what it does, e.g. ‘company name – 1:100’ (metric), or ‘company name – 1/8″=1’-0″ ‘ for imperial.

You should note that AutoDesk being totally dumb have excluded pretty much every symbol that describes an imperial or metric scale. So the above two examples have to be re-written to make sense but won’t actually follow standard notation.
– company name – 1_100 (metric)
– company name – 1_8_-_1-0 (imperial)

Again, this is only a suggestion of how to put it together, just keep it simple to allow others to get what the style is to be used for!
I am going to use metric for this example, however the principals will be the same for imperial.
So once you have entered the name, you will be presented with the (rather complex) dimension style editor box. This is a very powerful set of rules that can present dimensions however you want, some of the features are:
– rounding of dimensions
– scaling to other units, e.g. if you draw in mm, the dimstyle can display km!
– zero supression at both end and beginning
– location of text
– style of leaders
– style of lines and more!
The first tab to the left is lines, we will come back to that one. First lets set up the text.
Text

Change the text to the text style you created, this hopefully won’t grey out the text height in the dimension style. If you altered the text style height to anything other than 0, you caa change the height in this box, I usually use 2.
I like my dimension text to be centred and aligned to the dimension line.
When looking at the numbers on all the the tabs, they will be point something. This is because the defaults are set up for imperial. If in doubt change these to 1 for metric. Sometimes a 0.5 or 2 might be more suitable. A little playing with the numbers after creation will get the dimension style looking as you want it.
Lines

After the text is setup, lets look at lines. The default for this page is everything set by block. If you, like I, draw using layers, then change all “ByBlock” to “ByLayer”.
I also like to make my lines a little fancy by changing the extension lines to a grey (that plots light in colour) and to “hidden” to provide an unintrusive dashed line back to the origin points.
Don’t forget to change the spacings to 1.
Symbols and arrows

Most of the settings on this page are personal preference. I prefer architectural ticks on my dimensions and a little arrow on my leaders.
I found from experince that 1.5 for arrow size seems to work quite well, center marks at 1 and a break size of 2.
Fit

This one is where the overall scale (if not annotative) is set. Once one dimension style is set up, it can be copied at the “use overall scale” section changed to suit the scale. e.g. here we are going to change the overall scale to 100 for a 1:100 dimension style. If 1:50 change this to 50.
The rest of the options in this section I leave at default.
You will notice that once the overall scale is changed the preview might go wild. If it does, just close and click your style and click modify.
Primary Units

This is where the precision and rounding is undertaken for the dimension style. You can also add suffix to the dimension.
Here I have altered the precision to 0.0 and changed the round off to 0.5 as precision greater than this is not normally required at 1:100. In fact you could change the precision to 0 and round off to 1 or even 5. Round off takes the dimension of say 3549.23435 (if measured using DISTANCE) and displays a more friendly number in the dimension. So if the round off was 5 and the precision 0, the dimension would read 3550.
Alternate Units and Tolerances
These are not generally used in architecture and for this tutorial the defaults will be left on these two tabs.
One Reply to “Dimension style basics”